
Here’s how to convert a website that’s currently part of a WordPress multisite network into a standalone WordPress installation. I’m going to assume that if you’ve been tasked with tackling something like this you know some things about how WordPress works so I’ll gloss over the basics.
1. Find the site ID of the site you’re trying to extract
Open up the site you’re trying to move in a browser, and right-click on any image and click inspect. Dig around in there and find a URL and you should see something like this. You’re looking for the number after wp-content/uploads/sites. In this case we’ll be working with site ID 61.

If you’re using Firefox, you can right-click an image and tell it to view the image in a new tab. You’ll see the site ID in the URL.
2. Install a new WordPress instance
Find the WordPress version number on the multisite instance you’re extracting from and download it from wordpress.org. You can find older releases here: https://wordpress.org/download/releases/. You can find the current WordPress version by clicking the W icon at the top left of the admin panel and going to “About WordPress.” Get a blank copy of this version up and running on your new host (or elsewhere on your existing host).
3. Copy files to the new installation
Copy the themes and plugins folders from wp-content on the old installation to the new one. Since this is coming from multisite there may be extra themes or plugins that were used by other sites. You can prune them now or later. It’s usually easier to just copy everything and clean it up once you have the new site up and running.
You’ll also need to look under the /wp-content/uploads/sites and find the site ID you’re working with. Copy all of those files to the /wp-content/uploads folder on the new host.
4. Back up the database
You’ll need to get a copy of the database of the site you’re moving. You can either manually do this from the command line or phpMyAdmin, or use a plugin. The easiest plugin to use for our purposes is Database Backup for WordPress. Though not specifically designed for extracting sites from multisite, it makes it really easy to pull out just the database tables we need for the site we’re working on.
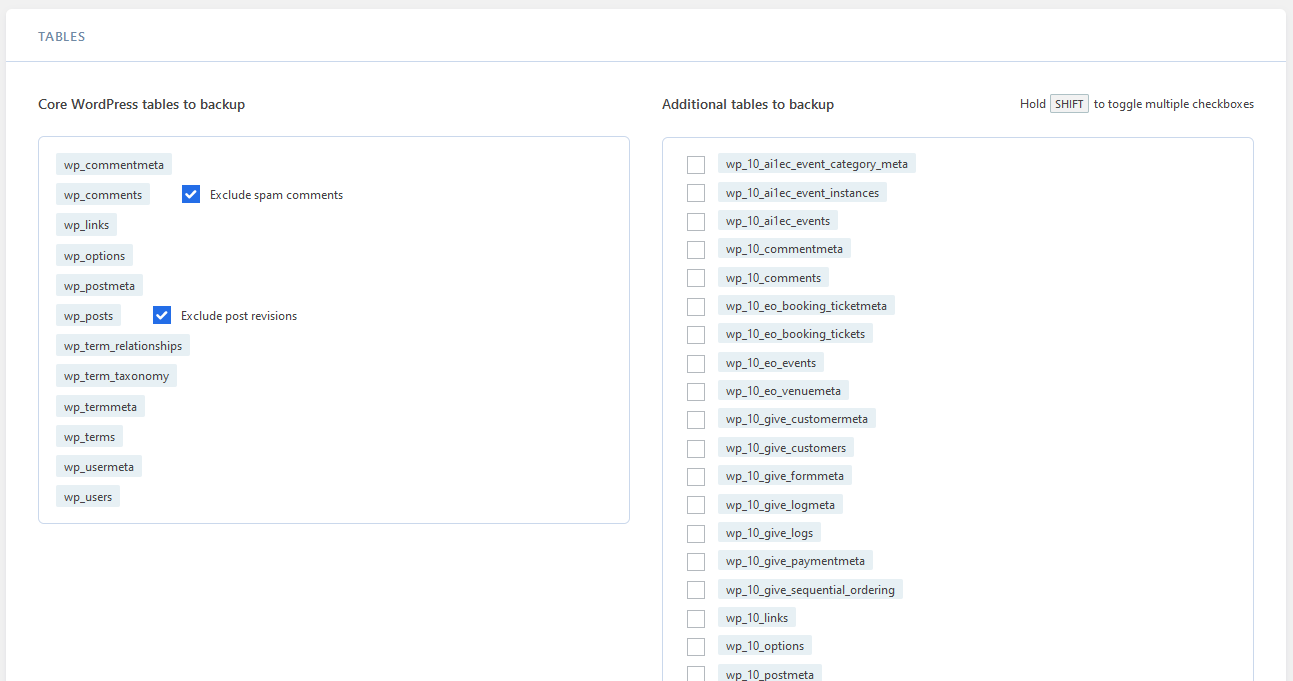
As you can see in the right-hand column under “additional tables to backup,” you can pick and choose what you want to back up. In our case, you’ll want to find all of the tables for wp_61 that will correspond to the data for site ID 61. The image above shows the tables for site ID 10 – but that’s just what was on top and easiest to grab the screenshot.
5. Import the database on the new host
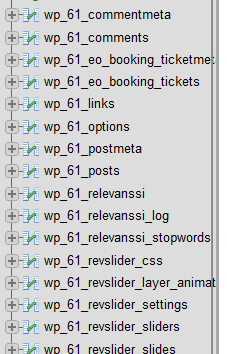
The easiest way to do this is using phpMyAdmin, but if you know what you’re doing with MySQL have at it. You should end up with a database with tables that looks like this:
6. Clean up the database
In addition to all of the wp_61_xxxxx tables you’ll see some standard looking wp_xxxxx tables. Rename wp_users to wp_61_users and wp_usermeta to wp_61_usermeta. Delete the other wp_xxxxx tables that don’t have the site ID in the name. This is data from the master installation from the WordPress multisite that you don’t need anymore.
7. Edit wp-config.php
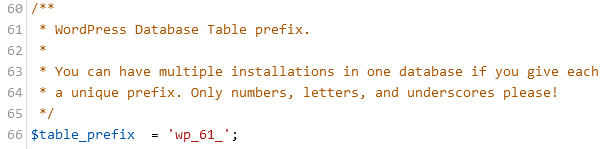
Open wp-config.php and scroll down to line 66. You’ll see: $table_prefix = ‘wp_’;. Edit that to look like the below screenshot, using your site ID in place of the 61 and save the file.
At this point your site should be up and running.
8. Updates and cleanup
Log in to the back-end of your new installation at /wp-admin. Existing usernames and passwords for the site should work. Go in to the Plugins and Themes sections and delete any unused items. There are most likely some that were used by other sites on the multisite that you won’t need.
Depending on how old the multisite installation you’re extracting from is, you may have some WordPress version upgrades to do as well as theme and plugin updates. At this point things should work as expected. In my case I was pulling from a long-neglected installation of WordPress 4.9.6 (current version at the time of this posting is 6.0.2) so I had some PHP version issues to get through (PHP 5.4 -> 8.0), but at the end of the day the site is up and running on its own.
You can also go in to the Users section and remove any users that aren’t needed on this installation. Copying the database the way we did maintained users for all of the sub-sites from the old system but most of those won’t be needed anymore.
You may run in to some issues with file locations (wp-content/uploads/sites/61/xxxx/ vs wp-content/uploads/) if images are being populated from a plugin or a theme customizer (like header logos or sliders). While moving things to the /uploads folder is cleanest, you can avoid some hassle if you leave all existing content under /sites/61/ and don’t run the database query to update locations in section 6 above.
To give credit where credit is due, I began my journey with the information posted by sanchothefat on StackExchange here, but at the time of this writing that information was almost 10 years old and didn’t work quite right after all that time. After some trial and error, I ended up with the above process.